
How to Roast Garlic
Learn how to roast garlic with this easy recipe! This foolproof technique yields the most delicious roasted garlic. Plus, find 10 ways to enjoy it!
Updated by Kathryne Taylor on August 29, 2024
27Comments
Jump to recipe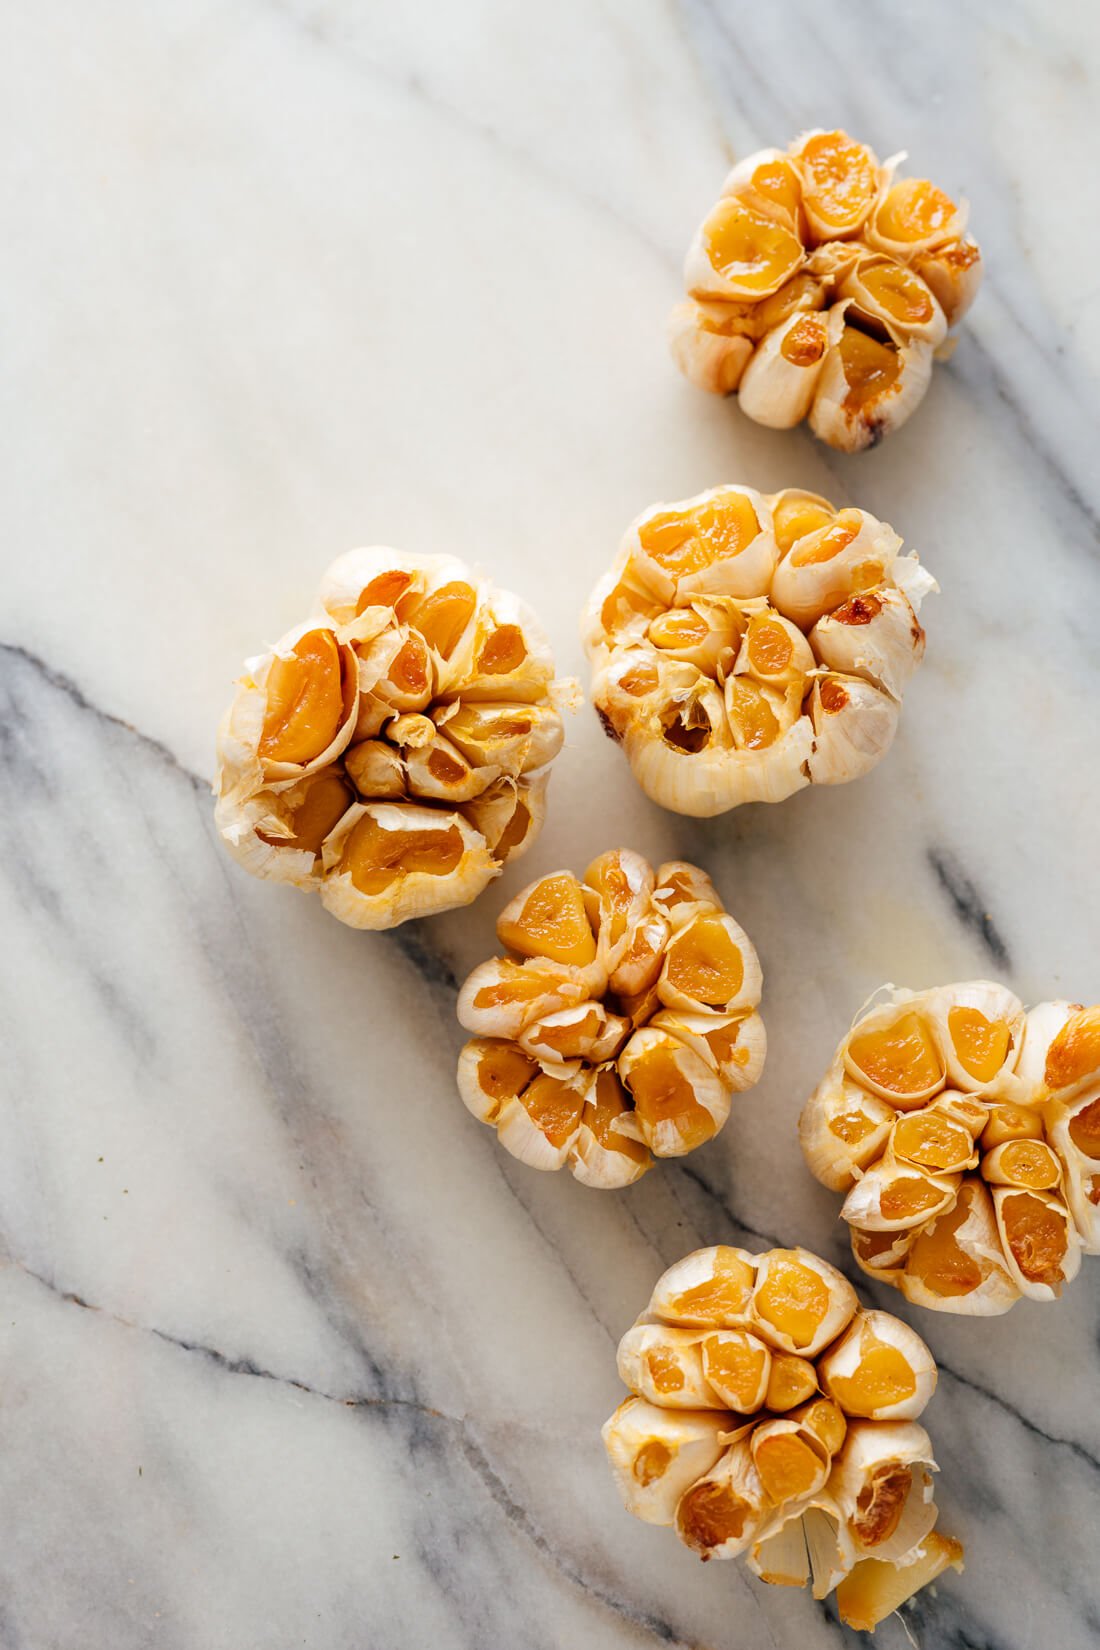
Roasted garlic is a revelation. Have you tried it? When you roast garlic long enough, it transforms from pungent and crisp to mellow and soft. It’s irresistibly caramelized and spreads over bread like butter.
Roasted garlic seems indulgent, but it’s really just garlic with a little bit of olive oil. Like I said, it’s a revelation.
I’ve loved roasted garlic since my friend introduced me to it in college. We developed a funny routine of roasting tons of garlic, which we enjoyed with crusty bread, too much red wine, and episode after episode of Arrested Development.
Back then, we wrapped our garlic in foil, which is what most roasted garlic recipes will tell you to do. These days, I try to minimize our aluminum exposure and cooking waste whenever possible. So, I came up with a foil-free method using basic cooking tools! Let’s roast some garlic.
How to Roast Garlic
I’ve tried roasting garlic every which way. Here’s the best way to do it:
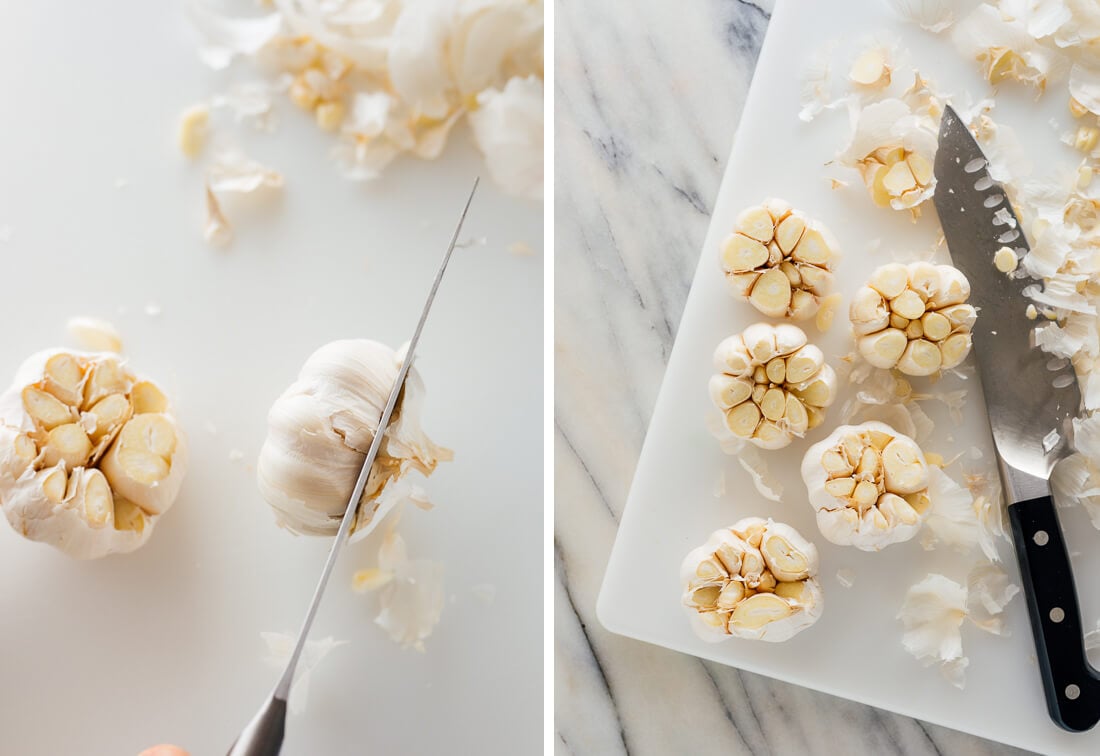
1) Slice off the top of the cloves.
If we don’t expose the cloves, the hot garlic will burst through the papery skins and burn. We don’t want that.
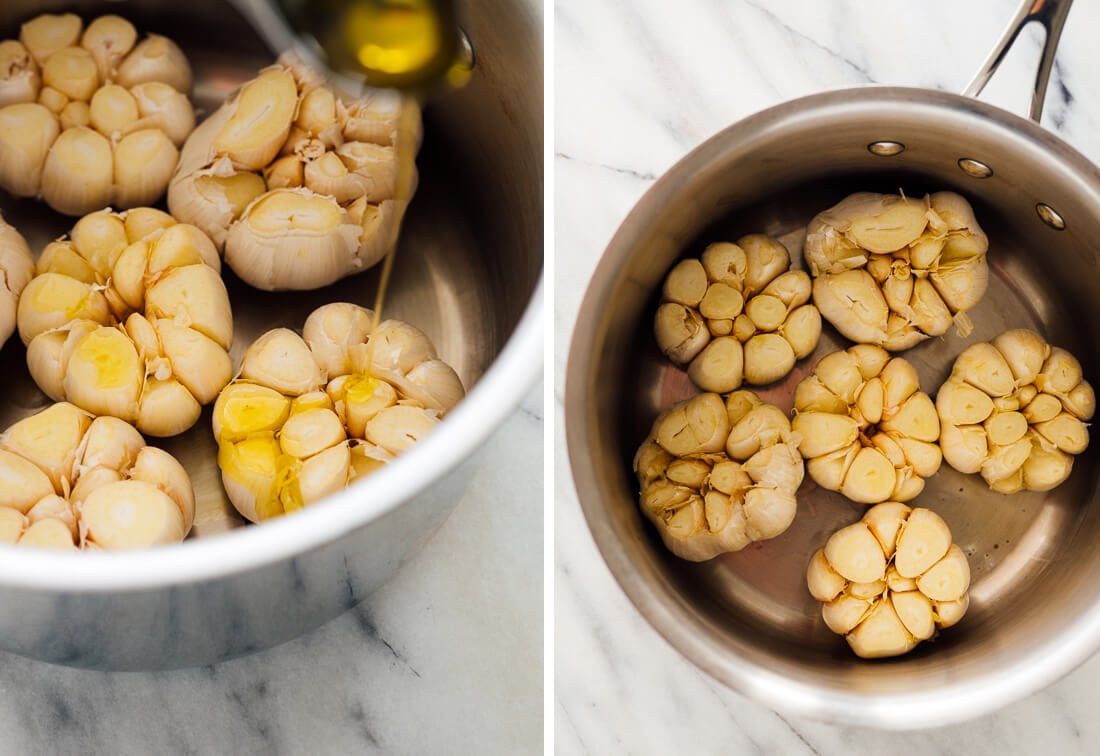
2) Drizzle with olive oil.
Oil increases the surface temperature of anything that it touches, which leads to more caramelization (yum). It also helps prevent the garlic from drying out, so it stays soft and spreadable.
3) Enclose the garlic.
Garlic tends to burn in dry, high heat, so we want to provide an environment that keeps it evenly heated and protected from the elements. Most recipes suggest wrapping it in foil. I place the heads of garlic in a stainless steel saucepan or skillet and cover it with an oven-safe lid. You’ll find more options in the recipe notes.
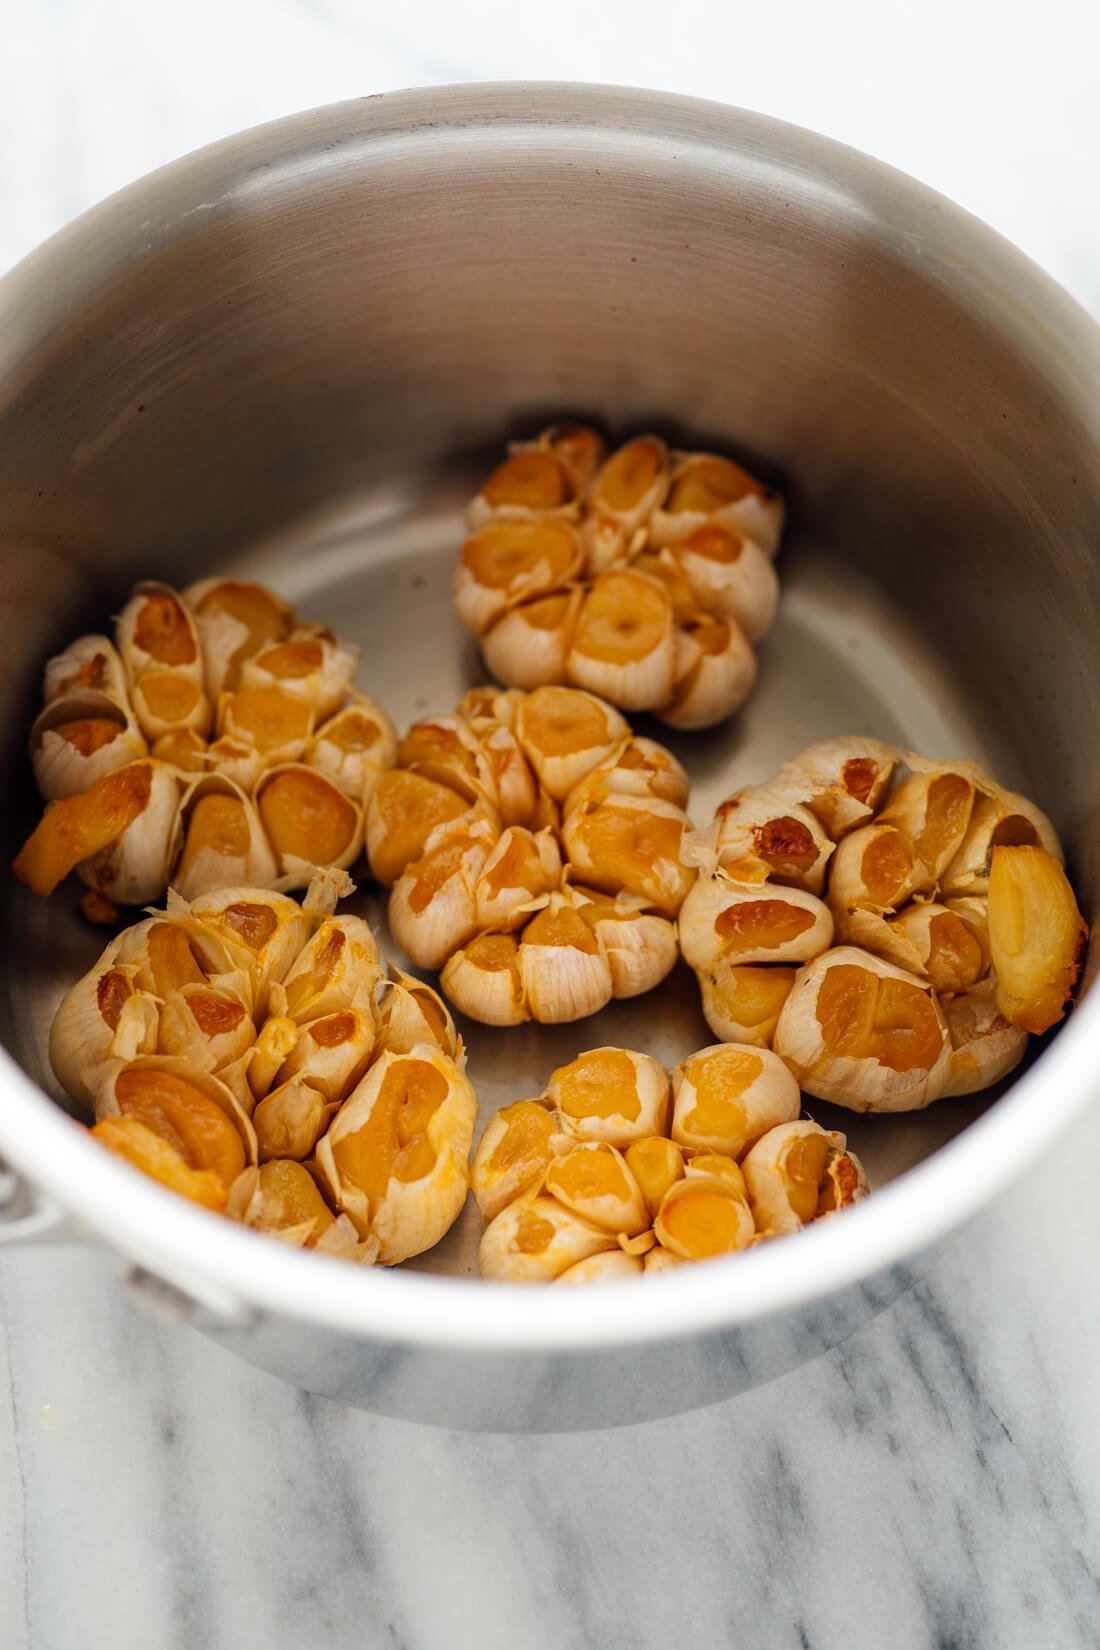
4) Roast until golden and soft.
The deeper the color, the deeper the flavor (within reason). Roasting could take anywhere from 40 minutes to 70 minutes. There are a lot of factors at play here—the length of time will depend on the size and quantity of the bulbs, their freshness, the amount of oil used, and your roasting preferences.
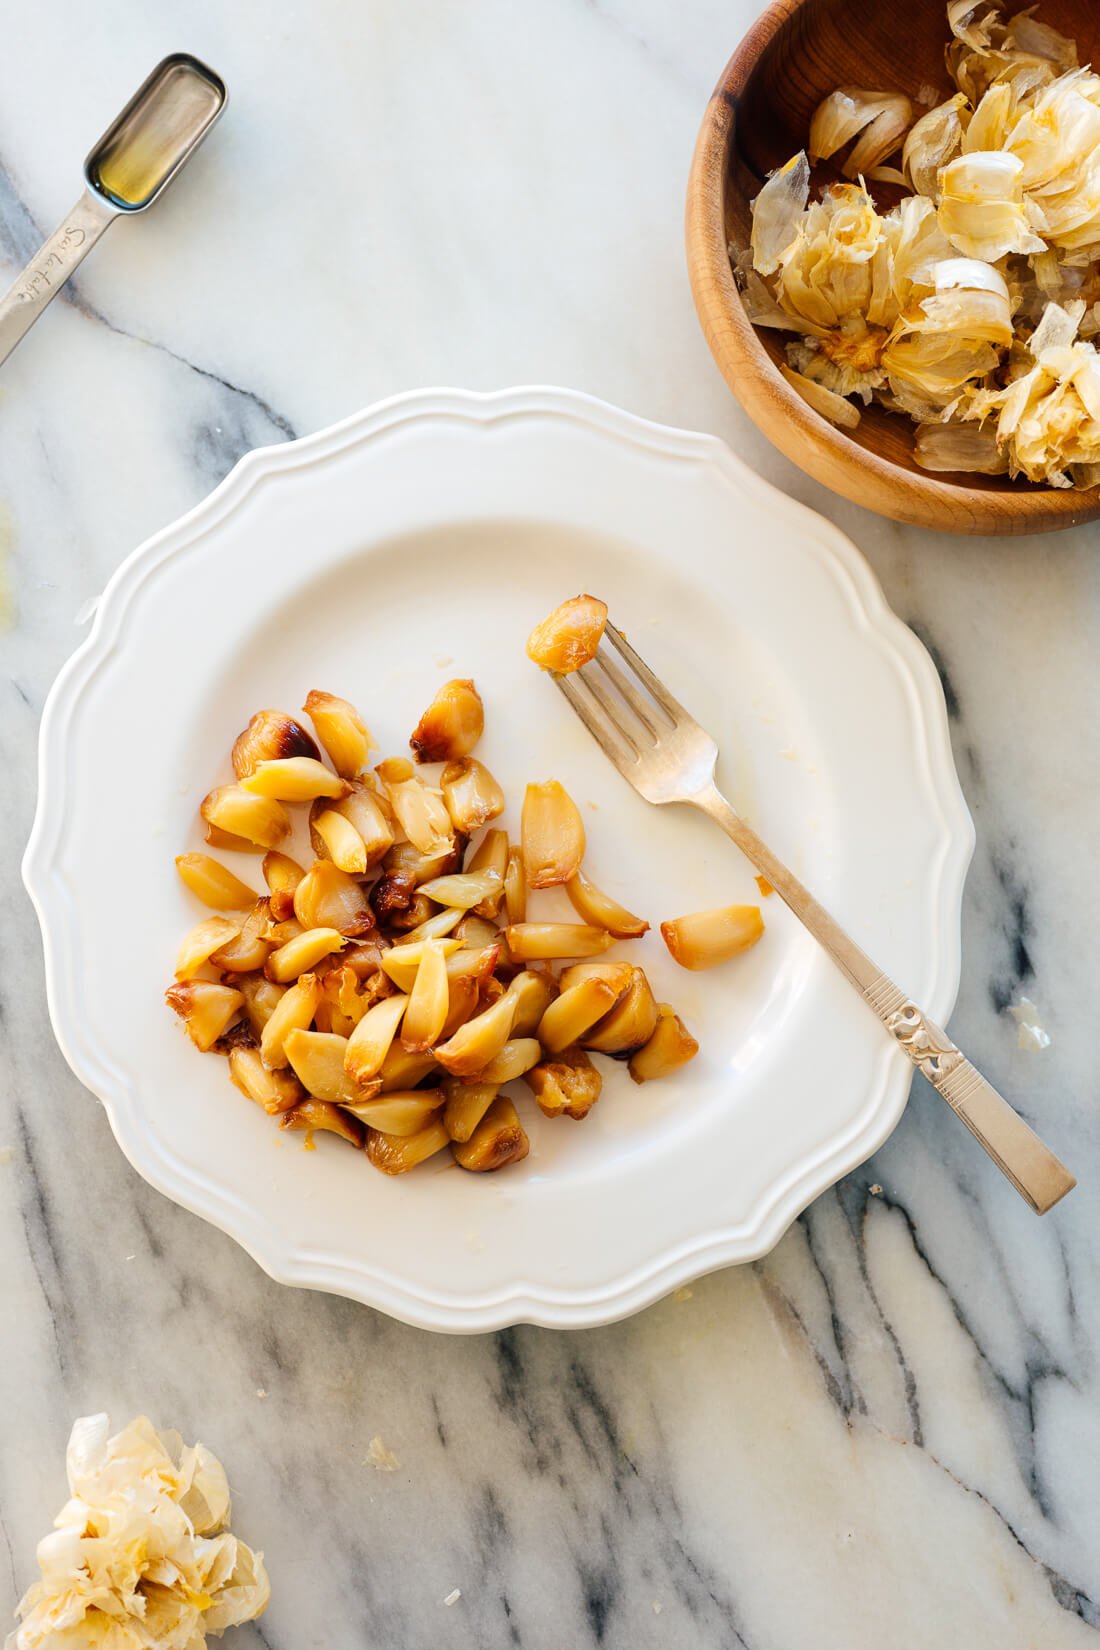
5) Let the garlic cool briefly, then use or refrigerate promptly.
The garlic will be blazing hot out of the oven, so let it cool for about ten minutes before you touch it. Don’t leave roasted garlic at room temperature for long. According to UC Davis, “Garlic in oil mixtures stored at room temperature provide an ideal environment for Clostridium botulium [botulism] to grow and produce toxin (low acidity, no free oxygen in the oil, and warm temperature). The same hazard exists for roasted garlic stored in oil.” Proper food storage is important!
Looking for a roasted garlic shortcut?
I love a good shortcut, but you’re honestly better off roasting the whole head. I tried roasting individual cloves, and they’re more finicky since they vary in size and need to be stirred often. It seems that the head of garlic provides an ideal roasting environment.
If you want to try the shortcut, the same rules apply. Cut the cloves open on one end to allow room for expansion (but leave the rest of the skin intact), toss them in oil and roast them inside a saucepan or something similar. Using oven mitts, carefully shake the pan every ten minutes to cook the cloves evenly. They’re done after 20 to 40 minutes in the oven. Small cloves will finish faster, so you may need to remove those from the pan sooner than the rest.
Watch How to Roast Garlic
Uses for Roasted Garlic
- Smear it onto good bread (toasted if you wish) or crackers. Top it off with some flaky salt! (affiliate link) Or perhaps even better—make roasted garlic bread.
- Make compound butter: Smash the garlic cloves into a paste with a fork and stir in room-temperature butter, to taste (for strongly flavored butter, use equal parts, or soften the flavor with additional butter). Season with salt. Be sure to refrigerate the mixture promptly and use it up within four days.
- Add it to your favorite recipes: Savory recipes that are rich and creamy or inherently garlicky are great candidates. Think mashed potatoes or baked potatoes with sour cream, buttery or tomato-based pasta dishes or soups, and dips and sauces, such as hummus, tahini sauce or aïoli.
Tip: When replacing raw garlic with roasted garlic, you’ll likely want to add more roasted garlic since the flavor is more mellow.
Garlic Nutrition & Considerations
Garlic is loaded with antioxidants and offers a diverse and unique range of sulphur compounds, the most famous being allicin. Garlic has shown promise in fighting the common cold, reducing blood pressure and cholesterol levels, and detoxifying heavy metals. Learn more about garlic nutrition here.
Most garlic studies focus on garlic supplements, not raw or roasted forms. It’s possible that roasting the garlic reduces some of the nutrients available, but I can eat a lot more garlic after it’s been roasted. Maybe it’s a toss-up? It’s delicious no matter what. Garlic is a member of the allium family, which includes onions, shallots and leeks—all of which are very good for you.
Buy local or organic garlic when possible. Over fifty percent of the U.S. garlic supply comes from China, and that’s a long way for food to travel. Store garlic in a dry, cool, dark place (like a cupboard, not the refrigerator). It will keep for up to a month.
Fair warning: Don’t go too bananas eating roasted garlic—eat more than a head or two, and your stomach might be upset with you the next day. I know that sounds like a lot of garlic, but when it tastes this good, it’s easy to go overboard!
Roasted Garlic
Learn how to roast garlic with this easy recipe! This foolproof technique yields the most delicious roasted garlic. Roast as much as you need; each head yields 1 to 1 ½ tablespoons mashed roasted garlic.
Ingredients
- 1 or more heads of garlic
- 1 to 2 teaspoons extra-virgin olive oil
Instructions
- Preheat the oven to 400 degrees Fahreneheit. Hold each head of garlic from the base and carefully slice off about ¼-inch of the top to expose the garlic cloves. We want to be sure each clove is exposed. You may need to peel off some of the outer papery material to see better. If necessary, use a paring knife to cut off the tops of the cloves on the sides. Repeat for additional heads of garlic, if needed.
- Place the garlic bulb(s) in an oven-safe stainless steel saucepan or skillet with an oven-safe lid*, with a base wide enough that the bulbs don’t touch the sides. Drizzle each bulb with 1 to 2 teaspoons of oil, enough to coat the exposed tops. You might need to use your fingers to rub oil that reaches the bottom of the pan back onto the tops.
- Cover your pan and bake for 40 to 70 minutes, checking every 10 minutes after 40 minutes is up (be careful, the pot will be very hot!). The heads are done when they’re nicely golden on top and the cloves are soft enough to easily pierce through with a paring knife. (For greater depth of flavor, roast 5 to 10 minutes longer, but watch out for signs of burning—an acrid smell, or blackened bits).
- Let the roasted garlic cool for at least 10 minutes, or until you can safely handle it. To release the cloves, use a fork (cocktail fork if you have one) or grapefruit spoon or just gently squeeze them from the base (I find this easiest for the inner cloves).
- Use your roasted garlic immediately, or promptly refrigerate for up to 4 days or freeze for up to several months (be sure to label your containers with a use-by date). Do not leave roasted garlic at room temperature, as botulism toxins can grow quickly under these conditions. Learn more about safe garlic storage here.
Notes
*Alternative roasting vessels: I came up with this technique to avoid using aluminum foil. Other options include a baking dish with an oven-safe lid. If you can’t find a suitable lid, try placing a baking sheet placed on top (I think that will work well!).
Nutrition
The information shown is an estimate provided by an online nutrition calculator. It should not be considered a substitute for a professional nutritionist’s advice. See our full nutrition disclosure here.


Hello, I made this recipe as written..YUM roasted garlic in my mashed potatoes.
That sounds delicious, Louise! Thank you for your review.
Love the recipe, I’ going to try it asap !
And many thanks for all your recipes. I seldom comment, but your blog is a permanent inspiration.
.
Regarding the risk of botulism, seeing your pictures, imho there is none.
“in oil” means exactly “in”, in other words the garlic should be immersed in oil, like in a bottle of garlic oil for pizza. The link you give even says “submerged” in oil. Though being soaked with oil the garlic is in contact with oxygen.
(And I doubt that with two teaspoon of oil the garlic cloves would be totally soaked…)
Fully/partially submerged doesn’t really matter. Even if oxygen is present you could still get very sick (botulism or otherwise) from not properly refrigerating garlic + oil preparations. Kate is wise to point this out so the reader is in no way confused about the need to refrigerate and consume within a few days! :) Kind regards!
I wanna be watching arrested development with roasted garlic bread and wine, right now! Also, roasting garlic in anything other than foil, and with the ability to roast multiple heads of garlic at once is absolutely brilliant!
I love it! Thanks for your comment, Stephanie.
I recently roasted whole garlic heads for the first time. I prepared them as you said but placed each head in a paper muffin case and then placed them on a flat tray. It worked very well.
Thanks for sharing, Sandra!
I roast garlic this way also, but I just cut the whole bulb in half, then squeeze out the garlic from each half when it cools enough, so I don’t lose that 1/4.” It’s also good with a little honey drizzled on the bulbs before roasting. Love your recipes, use them often, and also love your cookbook.
Thank you for sharing, Bonnie!
I frequently roast heads of garlic for different foods. I just put it, with tops cut as you show, brushed with olive oil on a cookie tray to roast in the oven. Typically I’m also making oven roasted French fries. Have never had the garlic burn. It’s always carmelized, smooth and yummy. The use of a pot in the oven seems unnecessary. Thank you.
Thanks for sharing your method!
I love roasted garlic! Like your reader Bonnie, I cut the bulb in 2 halves then squeeze out garlic from them: no waste! One recipe I like: mix the roasted garlic paste with yogurt (either Greek or regular), black pepper and salt; it’s delicious to dip oven roasted vegetables, particularly celeriac!
Thank you for sharing, Nathalie!
Thank you for the great tips! I usually roast cloves one by one and end up burning them 80% of the time, so I’m excited to try roasting the whole head. Even more importantly, I really really appreciate how you shared your thoughts and values about buying local, storing to reduce food waste, and reducing trash/other waste in this process. Thank you thank you!
I’m glad you liked the post, Kat! Let me know what you think when you try it.
Curious how long is too long to leave it out if you hope to eat it while it is still warm? If I use it for an appetizer, will an hour be too long at room temp?
Hey Jenna, I think less than two hours would be safe.
Kate this is another keeper- thanks for sharing
You’re welcome, Lizzy!
Do you think this could be used to make aioli? True aioli, not garlic mayo (ie: no egg). I wonder if it’s already soft it might emulsify more easily.
Hi, you could try it. Here is my cheater’s aioli: https://cookieandkate.com/easy-aioli-recipe/#tasty-recipes-33941
Am I missing something? What’s the oven set at?
Hi Eric! See step 1. 400 degrees. :)
I tried this recipe along with your garlic bread recipe (which came out delicious!), but both times I tried I had some issues with the garlic burning. The first time I had it on the top shelf in the oven, so I tried a different pan the second time, on the lower shelf, and it was better but still a bit burnt in a few places. It was still delicious, but I’m wondering if you have any ideas or suggestions to prevent this burning? I also had some issues squeezing the garlic out, and making a big mess with the peel everywhere. Do you completely peel the outside beforehand? Thank you in advance! :)
Hi Samantha! So glad to hear you loved the bread! I think roasted garlic is inherently a bit messy, to be honest. Sometimes I have better luck removing cloves with a fork; sometimes it’s easier to squeeze them out. Kinda depends on their position. Re: burning, yes, definitely always bake on the middle rack of the oven unless suggested otherwise. I’m also wondering if perhaps your oven runs a little hot. Or you might have better luck with a slightly larger pot, if you have it—my garlic got a touch burnt in the places where it touched the sides of the pan. Hope that helps!
Thank you for developing a recipe that is waste free, Kate!