How to: Propagate a Succulent
Updated by Kathryne Taylor on February 7, 2024
Have I mentioned my obsession with house plants yet? I’m convinced that house plants are one of the essential elements that make a house feel like a home. This spring, I caught house plant fever and snatched up every plant that caught my eye. Every flat surface near a window in my apartment is covered with green plants—my living room is turning into a veritable jungle!
I’ve since banned myself from purchasing more plants, but I don’t need to, anyway. I’ve learned how to make my own! Technically, I didn’t make them. I propagated them. Propagation is an intimidating word that means “vegetative reproduction”, or as I like to think of it, “magic”. When you propagate a plant, you’re basically creating another plant with the exact same genetic makeup as the original plant. That’s right, you can clone plants in your own living room!
My first experiments with propagation involved snipping off stems here and there and plopping them in a vase of water. Even the cuttings that didn’t grow roots made lovely green accents and lasted way longer than flowers.
Propagating succulents proved to be a more involved process, but far from difficult. I noticed that one of my succulents was growing pitifully more lopsided as the summer went by. One day, after a glass (or three) of wine, I couldn’t take it any longer. I declared, “Off with its head!” and snipped off the lopsided top section with a pair of sharp scissors.
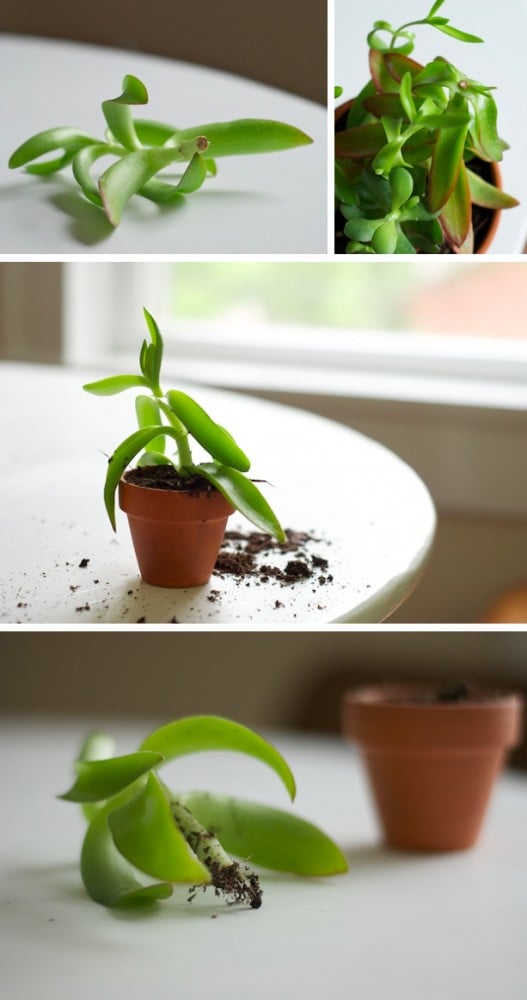
After some preliminary research online I had a decent understanding of how to propagate my succulent cutting, but I couldn’t find any good pictures of the process. Just what does a “callused” succulent cutting look like, anyway? Although the process itself is decidedly simple, I documented the process so I could show you how it works.
Here is how to propagate a succulent:
- Snip off a piece of a succulent stem with a few leaves on it. Lay it down inside in a shady spot for several days until the end of it has callused, meaning that the end is no longer a slick, shiny green but a rougher texture in a more muted shade. See examples of succulents with callused ends in the first row of photos.
- Once the end has roughened up, find a small pot with a drainage hole and add a layer of rocks at the bottom for even better drainage. Succulents are built for desert conditions and don’t fare well with excess water, so this is an important step. Fill the pot with soil designed for cacti/succulents, and plant your cutting. See the end result in photo 2.
- Don’t water your cutting yet! You’ll want to wait until it has started to grow roots before you water it. To check for roots, you can just pull it out of the pot and stick it back in. Once the roots appear, go ahead and water your cutting about once a week. Over watering a succulent is a surefire way to turn it into a mess of dull, soggy leaves.
- In a few weeks, your succulent cutting will have roots like the last picture, and you’ll have successfully propagated your own succulent. Voila!


excellent tutorial K! I’m glad I stumbled upon your blog. :)
Wow your pictures are amazing:)
Love your blog,I am now following you!
vanessa
xx
thank you for this post.. my love of plants is in full bloom, and i love succulents! im even throwin a few garden parties this summer. happy spring <3
I remember reading this awhile back. I just reread it. We are propagating our HUGE jade tree for wedding favors! Now I can use this tutorial 100 times :) then paint a bunch of little pots.
Your photos are really beautiful for this.
I am also going to use a rooting hormone to help the process. Wish me luck!
Good luck! I am sure the rooting hormone will help. I can’t wait to bring home one of your baby jade plants! Yay Kirsten and Dan!
Thank you so much for sharing how to propagate succulents. It’s so helpful, I included a link to this post in an entry I wrote about succulents and how easy hey are to grow.
http://shelovestocraft.blogspot.com/2014/03/gardening-for-those-that-kill-everything.html
hi :) how long does it take until the stem grows roots? I’ve just started mine a few days ago. The soil is totally dry already. It’s hitting 100 ºF here in my place already (summer it is). Should I just let it dry and wait until the roots grow, or at least dampen the soil? I’m getting worried, my entire plush plant did not survive, so here it is I’m trying to propagate it :(
Hi Janna, I’m not sure how long it takes, but I think it could probably use some water if it’s 100 at your place already!
awesome!! and straight to the point! giving this a try today! thank you
omg please tell me the name of the succulent in your pictures. I have this plant and I really want to read about it. I have no idea what its called. I’ve searched so many websites trying to identify it. Also for this plant will the base continue to grow if I cut the top off? Mine is growing too tall and slanted so I want to cut it shorter.
I have this plant too but also have no idea what it is- If you find out please let me know! I’ve propagated it a few times and the base will just keep giving off new stems so cut away! That being said one of the tall stems that I left has recently started to form little flower buds so maybe leave one if you can and see if this happens for you too :)
Hello, I know it’s been a while since this blog and that this is a long shot. But what is the name of the succulent in your picture? I got it as a wedding favor and didn’t have a name on it. Thank you in advance.
Hi there! That’s a fun favor. I’m sorry, I don’t remember and my plant-identifying app on my phone can’t seem to figure it out, either.